Abstract
Background Correction of adult spinal deformity (ASD) through minimally invasive techniques is a challenging endeavor and has typically been reserved for experienced surgeons. This publication aims to be the first high-resolution technique guide to demonstrate a reproducible technique for ASD correction utilizing circumferential minimally invasive surgery (cMIS) without an osteotomy. The Segmental Interbody, Muscle-Preserving, Ligamentotaxis-Enabled Reduction (SIMPLER) technique is a novel ligamentotaxis-based scoliosis surgery that represents a paradigm shift from traditional osteotomies toward patient-specific correction.
Methods The senior author’s (N.A.) cMIS technique for ASD correction without an osteotomy is described using high-resolution photographs, computer-generated imagery (CGI), and a case example. Step-by-step intraoperative photographs document a novel muscle-preserving posterior spinal exposure, spinal robotic safety protocol for instrumentation, dedicated deformity instrumentation system, rod reduction sequence, and minimally invasive fusion technique. CGI assists to reinforce technical considerations described by intraoperative photographs.
Results The SIMPLER technique is documented from incision to closure with high-resolution pictures including CGI to highlight concepts documented in photographs. Technical considerations were detailed for all aspects involved in the planning and execution of an osteotomy-free deformity correction.
Conclusion This represents the first in-depth technical description of ligamentotaxis-based, osteotomy-free, ASD scoliosis correction. The SIMPLER approach is reproducible and minimally invasive and can be done routinely for appropriately selected deformity candidates. This technique serves as a foundation to externally validate previously described cMIS ASD deformity correction outcomes.
Clinical Relevance Circumferential minimally invasive spinal deformity correction is reproducible and can be achieved reliably through the use of the SIMPLER technique, without the use of an osteotomy.
Level of Evidence 5.
- circumferential minimally invasive surgery
- technique
- adult spinal deformity
- osteotomy
- imaging
- computer-generated imagery
Introduction
Surgical correction of adult spinal deformity (ASD) has evolved through the years. Despite its tremendous corrective ability and radiographic appearances, posterior-only techniques experience significant perioperative morbidity with prolonged stay in the intensive care unit, high transfusion requirements, and elevated mechanical failure rates requiring revision surgery.1,2 Similarly, 3-column osteotomies are accompanied by high complication rates, and their utilization has declined.3 Mechanical complications have not significantly improved despite advancements in posterior techniques.4
Less invasive options for ASD correction have become popular, especially anterior, or lateral interbody approaches.5 However, surgeons still utilize open, posterior approaches for instrumentation and osteotomies. This “hybrid” technique is appealing for its ability to deliver large interbody fusion cages but is associated with similarly high complications, long operative times, and blood loss.6
This publication details the senior author’s (N.A.) circumferential minimally invasive surgery (cMIS) posterior technique for the correction of ASD without an osteotomy.7–9 Utilizing segmental anterior and lateral interbody fusions, combined with a muscle-preserving approach and posterior rod reduction system, we have named this the Segmental Interbody, Muscle-Preserving, Ligamentotaxis-Enabled Reduction (SIMPLER) technique. This represents a paradigm shift in realignment surgery that maximizes the preservation of native anatomy while minimizing collateral morbidity. While verbal descriptions have accompanied previous publications, no step-by-step technique guides exist to instruct surgeons on ASD correction purely through ligamentotaxis.
Methods
The senior author’s (N.A.) technique for cMIS, osteotomy-free, ASD correction was filmed and photographed from positioning through closure. Utilizing high-resolution photographs, a step-by-step technique guide was produced detailing the SIMPLER technique. Computer-generated imagery was employed to simplify and reinforce concepts within clinical photographs. A case description was used as an example.
Results: Technical Description
Patient Selection
There are radiographic and clinical findings that make for ideal SIMPLER technique candidates. Most notable is the presence of a non-ankylosed thoracolumbar spine. Because the technique relies on segmental anterior/lateral interbody cages to “loosen” the spine, the main consideration is the absence of ankylosis. However, an ankylosed segment does not preclude osteotomy-free deformity correction, as appropriate realignment can still be achieved through remaining unfused segments. Therefore, an assessment of ankylosis is mandatory for all SIMPLER technique candidates.
Severe spondylosis may have implications on the “rigidity” of a deformity, it does not prohibit osteotomy-free correction. Multilevel interbody fusion for ASD can be difficult, and a complexity checklist has been published to help in patient selection.10
The SIMPLER technique relies on indirect decompression11 and previously described clinical findings aid in the decision-making process. We anticipate successful indirect decompression when patient’s describe relief of symptoms with recumbency or sitting.12 However, this technique can be performed in a staged manner and success, or failure of indirect decompression can be assessed between stages.7 If direct decompression is necessary, it can be performed in a minimally invasive manner.
Preoperative Bone Health Management
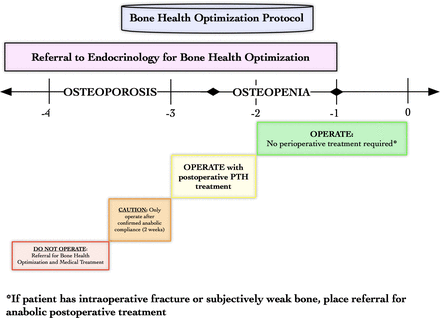
Numerous publications document the negative consequences associated with poor bone mineral density (BMD) during spinal surgery.13,14 However, there is no consensus for optimal treatment for improving BMD prior to ASD correction. The SIMPLER technique utilizes translational and rotational forces applied to the pedicle screw instrumentation. The spine must be prepared to accept these maneuvers with minimal screw pullout. Furthermore, with cMIS techniques of the screw–bone interface is not visualized, making it even more paramount that the screw purchase is optimal. Figure 1 is a graphical representation of the BMD treatment algorithm utilized for the SIMPLER technique and has been published previously.15
Bone health optimization protocol: graphical representation of the treatment algorithm. Treatments are based on nonspine dual-energy x-ray absorptiometry T-scores. Any patient meeting World Health Organization criteria for osteopenia or osteoporosis is referred to endocrinology for bone mineral density optimization. T-scores > −2 do not require preoperative treatment with anabolic agents; however, if there are any intraoperative concerns for poor bone quality (fracture, screw pullout/plowing, poor screw purchase, and poor bony tactile feedback), they are started on anabolic therapy postoperatively. T-scores ranging from −2 to −3 are arranged to begin anabolic treatments, but this does not have to be started prior to surgery. It can be initiated in the postoperative period, avoiding delays in surgical intervention. T-scores 3 to −3.5 have their operation postponed until completing endocrine evaluation and demonstrating anabolic medication compliance for at least 2 weeks. Anyone started on anabolic treatment continues therapy for at least 1 year postoperatively. If T-scores are less than −3.5, surgery is postponed, and the patient is treated medically until demonstrable improvements are observed.
Level Selection
Level selection begins by spanning the entire Cobb angle of the deformity within the lumbar spine. Instrumentation is never stopped at the apex of a curve. The upper instrumented vertebra (UIV) is determined by selecting the most proximal, neutrally rotated vertebrae within the Cobb, with a normal disc above it. Radiographs, magnetic resonance images (MRI), and computed tomography (CT) images are analyzed to make this decision. When double curves are present (both lumbar and thoracic curves), the senior author has reported selectively instrumenting the thoracolumbar spine, maintaining the UIV in the lower thoracic spine.16 Analyzing standing radiographs between the stages after the segmental anterior/lateral interbody cages are done has shown significant sagittal correction negating the need for thoracic instrumentation.
Lowest instrumented vertebrae (LIV) choice typically involves pelvic instrumentation. Controversy persists regarding sacral or pelvic fixation in long-construct spinal fusions, and we recognize that many variables may impact a surgeon’s choice.17 The senior author will select an LIV at the L5 level if there is a parallel, normal L5 to S1 disc and the patient is not experiencing L5/S1 radiculopathy. If there is any L5 to S1 arthropathy, tilt, stenosis, sacral obliquity, or sacroiliac degeneration/dysfunction, the LIV spans to the pelvis.
SIMPLER Technique Stage 1:“Segmental Interbody”
The first stage of the SIMPLER technique relies on segmental anterior and lateral interbody fusions. This stage of the protocol has been described in detail within previous publications,18 but a basic description is necessary. Interbody devices are typically inserted from L1 to S1 levels (through anterior and lateral approaches) to release and manipulate the anterior column via the restoration of disc height at multiple levels.
All interbody approaches to the lumbar spine are done in the lateral decubitus position with left side up. The approach is decided by studying the MRI with regard to the bifurcation of the great vessels. If a segmental level lies below the bifurcation, an anterior lumbar interbody fusion (ALIF) is done in the lateral position or could be done in the supine position. At the other levels above or at the bifurcation, a prepsoas lateral approach is performed, and a lateral interbody device is used. Hence with the usual bifurcation at or below L4 to L5,19 an ALIF is performed at L5 to S1 levels with a prepsoas lateral interbody fusion accomplished at L4 to L5 and above. A vascular approach surgeon is utilized for any level undergoing an ALIF procedure. The oblique lateral, prepsoas approach is performed across multiple levels, typically up to the L1 to L2 level. Care is taken to stay within the retroperitoneal space while avoiding levels that enter the chest cavity.20
If the chest cavity is entered, a red rubber catheter is inserted into the thoracic space at the conclusion of the procedure. This is attached to suction. The catheter is then withdrawn while a purse string suture closes the opening in a watertight manner. We have had to place a chest tube in these patients.
The restoration of disc height through ligamentotaxis is an essential component to this technique. Disc spaces are serially dilated with increasingly larger smooth trials until there is a subjective sense that maximum dilation has been achieved. While this “feel” is subjective, the implant should have no toggle and be firmly seated between the endplates. We have found that an ALL release is rarely ever needed and is seldom performed. We reserve ALL release for patients with an L3 to L4 segmental kyphosis above an L4 to S1 fusion or a L2 to L3 segmental kyphosis above L3 to S1 fusion. We prefer this approach over a posterior osteotomy, provided lordosis distribution is appropriate as per patient’s sagittal profile.21 However, posterior osteotomy remains an option if anterior correction was determined to be unsatisfactory.
Recombinant bone-morphogenic protein 2 (rhBMP-2) is utilized within the interbody cages to enhance fusion. For each ALIF level, 4 mg of rhBMP-2 is utilized with 3 mg per level for the lateral interbody cages.7 Any levels containing an anterior or lateral interbody cage do not undergo formal posterolateral fusion during the second stage of the technique. The senior author prefers to stage the procedures in a delayed fashion (2 days interval), and when 4 or more segmental levels are instrumented, patient is physiologically elderly and/or has 2 or medical comorbidities. In a medically stable patient, this could be performed during a single anesthetic event.
SIMPLER Technique Stage 2: “Muscle-Preserving, Ligamentotaxis-Enabled Reduction”
The posterior stage is centered around soft tissue preservation. Percutaneous, “stab” incisions are not performed for this technique. Instead, a “midline muscle sparing” (MMS) approach is utilized with a standard midline skin incision encompassing all levels undergoing instrumentation.
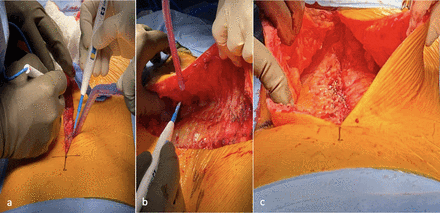
A scalpel incises the skin (Figure 2a), followed by electrocautery dissection to the lumbar fascia. When approaching the lumbosacral spine, the lumbosacral fascia is first encountered. Moving proximally, the latissimus dorsi fascia may be encountered. The dissection remains superficial to the most dorsal muscular fascial layers, and lipocutaneous flaps are elevated outward toward the Wiltse interval (Figure 2b). This interval will be used for instrumentation.
“Midline muscle sparing” approach. (a) Standard midline skin incision. (b) Elevation of lipocutaneous flaps, staying superficial to muscular fascial layers. (c) Completed midline muscle-sparing approach with bilateral lipocutaneous flap elevation to the Wiltse paraspinal interval.
The pedicular distance from midline increases when moving from the thoracic spine to the lumbosacral junction. Therefore, the lipocutaneous flaps at the lower thoracic spine will require less lateral dissection than the flaps near the lumbosacral spine. At the lumbosacral junction, lipocutaneous flaps are elevated lateral to the posterior superior iliac spine (PSIS; Figure 2C).
This MMS exposure is more cosmetically appealing than multiple incisions from percutaneous instrumentation. Additionally, it allows for full fascial closure, which may not be possible with percutaneous incisions. Lastly, rod passage is much easier and ensures subfascial rod placement, which is a formidable task during percutaneous surgery.
The senior author prefers robotic navigation-assisted spinal instrumentation, but this is not mandatory for the SIMPLER technique. Prior to the adoption of a robotics platform, the senior author routinely employed traditional fluoroscopically assisted Kirschner wire (K-wire) techniques.
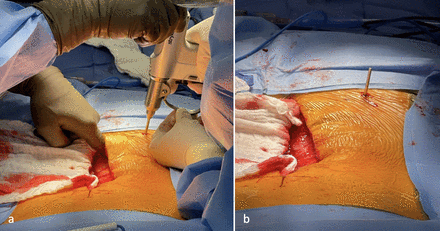
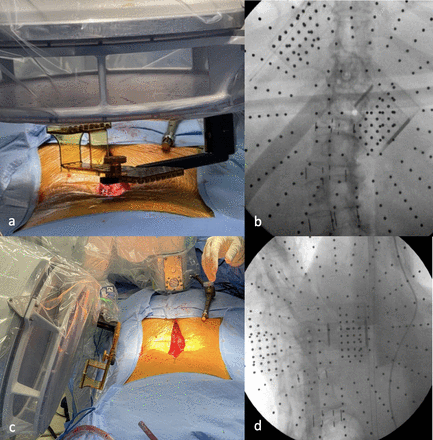
The robotics platform uses a reference pin placed into the pelvis at the PSIS. Utilizing the MMS approach, the surgeon can palpate the PSIS and place the PSIS reference pin percutaneously (Figure 3a–b). This method for pin placement is safest as the surgeon can ensure that the pin is not errantly placed into the sacrum.22 Intraoperative radiographs are then matched to preoperatively obtained CT images (Figure 4a–d) to register the patient for navigation. This helps with the operating room flow and efficiency as intraoperative CT is avoided, thus saving time. Screw trajectories are planned to ensure maximal screw purchase. If dysplastic pedicles are present and prevent at least a 5.5 mm pedicle screw diameter, the screw can be omitted or alternatively utilize an “in-out-in” juxta-pedicular trajectory.23
Robotic pin placement. (a) Palpating the posterior superior iliac spine through the midline muscle sparing incision allows for safe pin placement and prevents errant sacral placement. (b) Completed pin placement through stab incision. This reference pin is the site for robotic arm attachment.
Computed tomography (CT) to fluoroscopic registration. (a) Anteroposterior fluoroscopic registration with robotic arm reference markers. (b) Fluoroscopic image obtained from anteroposterior. (c) Lateral/oblique fluoroscopic registration with robotic arm reference markers. (d) Fluoroscopic image obtained at lateral/oblique. The spinal cortical densities in combination with the navigation markers are matched to a corresponding preoperative CT image. This is the basis for navigation registration.
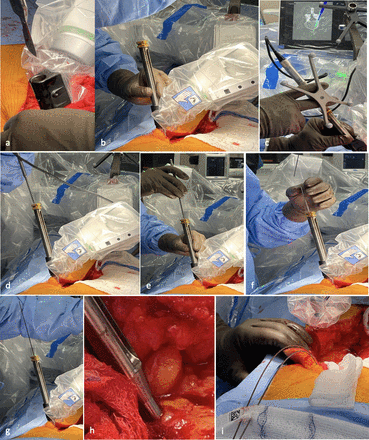
Pedicles are cannulated with K-wires from proximal to distal. Placing K-wires allows assessment of radiographic safety prior to screw insertion. This is performed via a “trust-but-verify” technique (Figure 5a–i) that ensures safety during every aspect of the robotically assisted instrumentation. Listed below are the 10 steps for the “trust-but-verify” robotic cMIS technique:
Aim robotic effector-arm down the planned pedicle trajectory
Fascial incision
Muscle dilation and working channel deployment
Navigated pedicle tract opening
Navigated tap insertion
Pedicle breach inspection with ball tip probe
K-wire sleeve introduction with a “straw cannula”
K-wire placement and seating
Removal of working channel
Hemostasis and K-wire management
“Trust-but-verify” robotic instrumentation safety protocol. (a) Long-handled scalpel blade is introduced to create a fascial opening for working channel insertion. (b) Working channel insertion is introduced down to bone, dilating through the muscle to provide a channel for tool passage. (c) The high-speed burr is introduced to open the initial pedicle screw trajectory. (d) A pedicle tap 1 mm less than the pedicle screw diameter is introduced to the pedicle channel. (e) A long ball-tipped probe is introduced to “feel” the walls of the pedicle for breaches. (f) A Kirschner wire (K-wire) introduction sleeve (“straw”) is placed. (g) K-wire is placed through the “straw” and gently impacted into bone to prevent dislodgement from the prepared pedicle channel. (h) Perifascial incision can be packed with gauze to limit bleeding upon removal of working channel. (i) K-wires are managed superficially and later inspected with fluoroscopy for safe trajectory. If there is ever concern for pedicle breach, a ball-tipped probe can be inserted at any step to inspect the pedicle walls.
Lipocutaneous flaps are manually reflected away from the path of the robotic-aiming arm, and a fascial incision is made with a long-handled scalpel (Figure 5a). There should be minimal tension on the lipocutaneous flaps throughout the procedure.
A muscle-dilating retractor is placed down to bone (Figure 5b). This working channel ensures that all instruments for pedicle cannulation are now protected from surrounding muscle and ligaments. Pedicle cannulation begins with a navigated, high-speed burr. A gentle “bouncing” motion is used to ensure that the burr is always intraosseous (Figure 5c). If there is any safety concern, the drill can be removed, and the path inspected with a ball-tip probe.
Next, a navigated tap is introduced (Figure 5d) and advanced just distal to the junction of the pedicle and vertebral body. Like a traditional open approach, pedicle walls are palpated with a ball-tipped probe to evaluate for pedicle breach (Figure 5e). A K-wire is introduced (Figure 5f) and gently impacted into bone to ensure that it does not accidentally dislodge at a later stage (Figure 5g).
The working channel can now be removed (Figure 5h), and pedicle bleeding is typically encountered. This can be controlled with gel foam, flowable hemostatic agent, and/or surgical sponge tamponade placed into the fascial opening. Lastly, K-wires are managed under pretensioned towels/sponges outside the skin incision (Figure 5i). The technique is repeated for all pedicles within the planned construct. A single-lateral fluoroscopic image is then utilized to confirm safe, intraosseous K-wire placement.
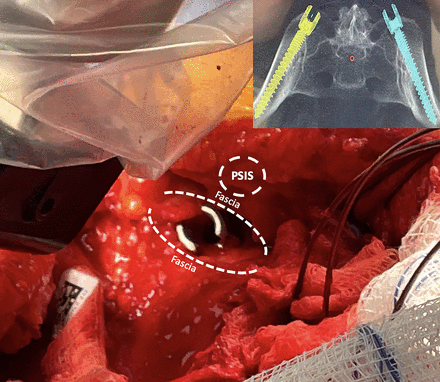
Instrumentation starts at the pelvis. The pelvic screws are advanced until the screw heads are seated slightly above the fascia. The screw is left proud (above the fascia) until the remaining instrumentation has been completed (Figure 6). This is an important step as the pelvis screw extender towers would project into the path of the instrumentation that has yet to be placed. Pedicle screws with attached extension towers are then placed over the K-wires at the other levels in a typical fashion.
Placement of pelvic instrumentation. A small fascial opening is made medial to the posterior superior iliac spine (PSIS). A small cuff of fascia tissue is left attached to the PSIS for lateral repair. The screw head is left prominent and visible above the fascia. Later, a screw extender tower can be attached before the screw is driven below the fascia. Inset radiograph demonstrates the “subcrestal” iliac screw trajectories that allow the screw head to eventually be driven below the fascia.
A reduction tower is attached to 1 of the pelvic screws, and the screw is driven below the fascia. Because a “modified iliac” or “subcrestal” screw trajectory is utilized,24 driving the screw below the fascia and into bone will still yield a mobile, poly-axial screw head to assist with later rod passage and reduction (Figure 6, inset). With the completion of instrumentation, fluoroscopy can again be brought in to confirm safe placement.
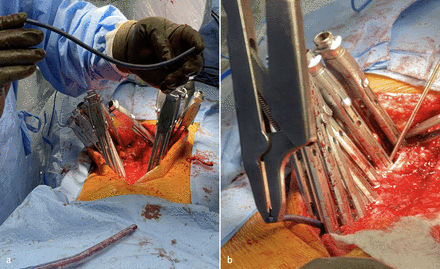
To measure the length of the rod, an electrocautery cable or rod template is run alongside the pedicle screws from the UIV to the LIV. Approximately an inch is added proximally and distally to this measurement for the final rod length. The senior author prefers 5.5 mm titanium alloy rods. The rod is cut to the appropriate length and overcontoured in the sagittal plane to achieve the desired correction (Figure 7a). No coronal contouring is performed. The rod is passed under the fascia (Figure 7b) from proximal to distal. Fascial incisions may be connected as necessary for rod passage. Alternatively, a precontoured 5.5 mm titanium rod can be commissioned, and this can be used similarly.
Passing the rod. (a) With instrumentation completed, an overcontoured rod is harmoniously bent, ensuring there are no sharp angular bends that notch the rod. (b) The rod is slid under the fascia into all the screw extenders. The midline muscle-sparing incision makes this aspect of minimally invasive surgery much easier than percutaneous techniques.
Simultaneous Rod Reduction and Deformity Correction Through Ligamentotaxis
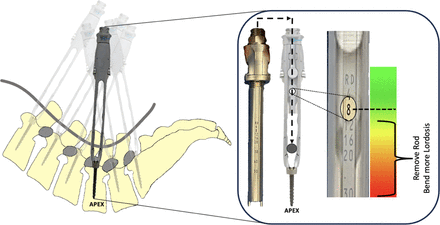
Rod reduction during the SIMPLER technique will achieve 3 goals simultaneously: lordosis creation, spinal translation, and spinal derotation. Rod reduction begins at the apex of lordosis. This differs from other techniques that reduce the rod from proximal to distal or vice versa. The pedicle screw extenders feature dedicated, graduated, sequential reducers with a window that displays a numeric value corresponding to the distance the rod must travel before it is fully seated (Figure 8). This ability to see the distance of the rod from being seated into the screw tulip is critical with MIS techniques as rod seating is not able to be visualized. This reduction technique relies on the spine being reduced to the rod.
Reduction to the apex of lordosis. Starting at the apex of lordosis, a rod reducer is inserted into the screw extender. This reduction tower has numerical readouts that are displayed in a window on the side of the extender. These numeric values correspond to the distance needed for complete rod reduction into the screw head. Once the rod reduction tower is inserted into the extender, it is advanced until resistance is encountered. The display window should read 8 mm or less. If a greater value is observed, remove the rod and bend more lordosis into the rod.
A rod reducer is inserted down the pedicle screw extender at the apex of lordosis. An important pearl to remember is that the surgeon should not encounter resistance until the rod is 8 mm from being fully reduced (Figure 8). A rod that is under-countered presents several risks for this specific deformity correction technique: mainly, screw pullout and failure to achieve lordosis (ie, flatback). If the surgeon encounters resistance from the rod being under-countered (ie, encountering resistance with a numeric value >8 mm), remove the rod and bend more lordosis (Figure 8).
Once the rod has been appropriately contoured and is within 8 mm of being fully seated at the apex of lordosis, adjacent rod reducers are utilized. The goal is gradual, sequential rod reduction with the assistance of adjacent screw towers until the rod is fully seated into the apex of lordosis.
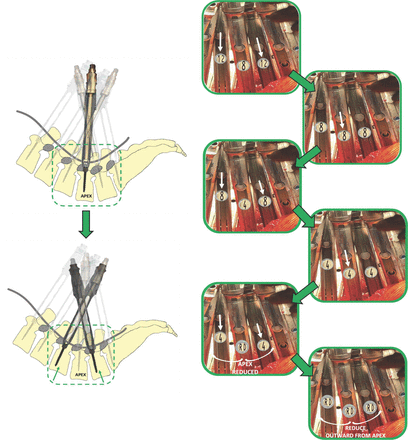
To demonstrate this reduction, consider the example in Figure 9. A numerical value of 8 mm is displayed in the reduction window at L4 (apex of lordosis), and resistance is encountered. While placing rod reducers at L3 and L5, the surgeon will encounter resistance earlier, and the display window will reveal higher values than the apex of lordosis (>8 mm). With the tower windows of L3 and L5 reading 12 mm, the surgeon can advance L3 and L5 through that resistance to reach a numerical value of 8 mm. The surgeon can then return to the apex of lordosis (L4) and further reduce the rod with less resistance than previously encountered. In this example, a numerical value of 4 mm at the L4 rod reduction window is displayed. The surgeon switches back to the adjacent rod reduction towers (L3 and L5) and advances them to 4 mm. This again lessens the forces required at the apex screw tower (L4). When the surgeon returns to the apex of lordosis (L4), it can now be advanced to the fully reduced (RD) position with minimal resistance. This sequence reduces the rod into the apex (deepest location) without excessive forces acting solely on that apex screw.
Serial rod reduction to the apex of lordosis. This diagram demonstrates equal force distribution across multiple screw reduction towers. The goal is for reduction to the apex of lordosis first. With an initial display of 8 mm at the apex of lordosis, adjacent towers will likely read slightly higher in an appropriately overcontoured rod. By reducing the adjacent screw towers, this will lessen the forces on the rod at the apex of lordosis. Once the adjacent screw towers are reduced to 8 mm, the surgeon can reduce the apex to 4 mm. Switching back to the adjacent towers, the surgeon reduces L3 and L5 down to 4 mm. The apex should now easily reduce (RD). Once the apex of lordosis is reduced, the adjacent towers can be reduced as well. Reduction of the adjacent levels after the apex will hopefully impart a force onto the spine and create lordosis.
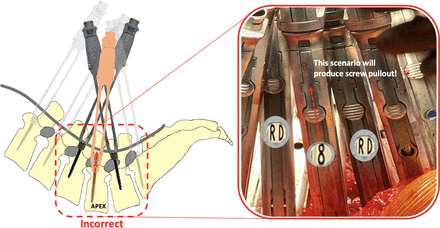
A commonly observed error is reducing levels other than the apex of lordosis prior to reducing the apex first (Figure 10). In this example, the L3 and L5 reduction towers were fully reduced before L4 (apex). The rod is flexible, but it cannot undergo an acute angular deformation between 2 adjacent screws. In this incorrect scenario, reducing the rod at L4 after the adjacent screw towers were fully reduced yields only 1 outcome: screw pullout. This is why it is crucial to reduce to the apex of lordosis first.
Incorrect rod reduction sequence. The above-noted diagram demonstrates the improper technique for the reduction of the rod. When the adjacent screw towers around the apex of lordosis are fully reduced (RD) before the apex, this creates a scenario that will only result in screw pullout. The 5.5 mm titanium alloy rod has some flexibility but will not accommodate an acute deformation into the screw head with the adjacent levels fully reduced. Surgeons should take care to reduce to the apex of lordosis first.
With the apex of lordosis fully reduced, the surgeon can now work outward from this position to serially reduce the rod. In a similar fashion, adjacent rod reduction towers equally distribute forces across the rod to minimize the risk of screw pullout. Once the rod is fully reduced within a screw tulip, the endcaps can be final-tightened, and the extender/reduction tower can be removed. This will allow the adjacent towers to “relax” into a more lordotic position along the rod, allowing for further rod reduction and creation of lordosis.
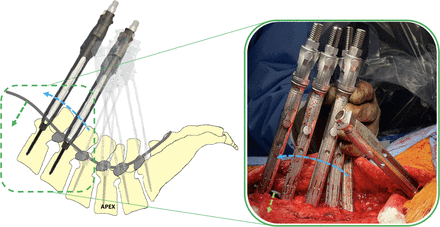
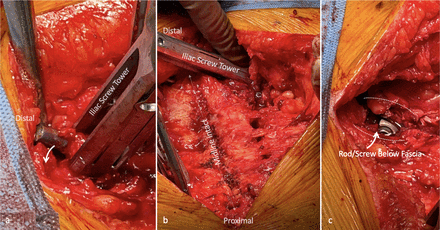
An appropriately contoured rod will fully reduce into the UIV screw head prior to applying any rod reduction forces (Figure 11). This minimizes pullout forces at the UIV, reducing the risk for proximal junctional kyphosis (PJK) or proximal junctional failure. The rod should also reduce into the pelvic screws with minimal effort (Figure 12).
Serial rod reduction toward the upper instrumented vertebra (UIV). Reducing the rod toward the UIV will eventually force the rod into the screw heads with very little effort. In an appropriately overcontoured rod, rod reducers inserted near the UIV should require almost no reduction.
Rod reduction into the pelvic screw head: With a modified iliac screw trajectory, polyaxial screw head can still rotate to accommodate variation in rod position. (a) Pictured is the iliac fixation driven under the fascia with an attached screw extender. The rod has not yet been fully reduced. The rod was aggressively overcontoured to ensure that the apex of lordosis is within 8 mm, but this results in a prominent rod tip. Further reduction will eventually drive this rod below the fascial level (b) With serial reduction around the apex of lordosis, the iliac screw tower is visualized by itself with an intact midline supraspinous ligament. (c) With the reduction of adjacent screws and eventually the iliac screw, the rod disappears under the fascia to prevent prominence and ensure that a full fascia closure is achievable. The dotted lines represent cuffs to fascia tissue that can be closed later.
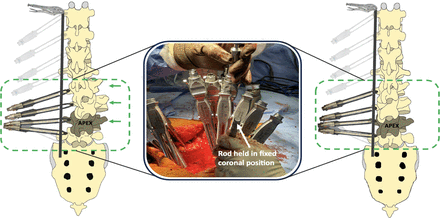
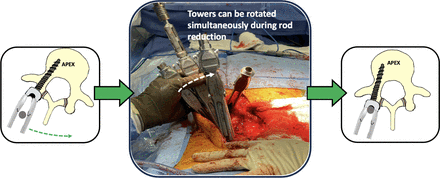
The rod is held firmly in the coronal plane during reduction. Serial rod reduction imparts significant translational and rotatory forces onto the spine (Figure 13). This will result in the spine reducing to the rod. It is this interaction that will produce spinal deformity correction, which we have termed “ligamentotaxis-enabled reduction.” The spinal deformity is not corrected through osteotomies, but through sequential anterior releases with disc height restoration in combination with this posterior rod reduction, culminating in spinal translation and derotation (Figure 14).
Spinal translation during rod reduction. With the rod held in fixed coronal position, the dedicated rod reduction towers can impart significant forces on the residual spinal deformity. Additionally, distributing the forces across multiple adjacent screw towers helps prevent screw pullout during this process.
Spinal derotation during rod reduction. Throughout the reduction process, forces are being applied in multiple planes. Derotation can occur with pressure applied to the reduction towers. It should be noted that linked segmental derotation is not performed in this technique.
The senior author does not perform differential rod contouring25 or linked/en-bloc segmental derotation26 to achieve deformity correction. These maneuvers may be suitable for adolescent idiopathic scoliosis curves but are not required for ASD correction with the SIMPLER technique.
Achieving Fusion in SIMPLER Deformity Correction
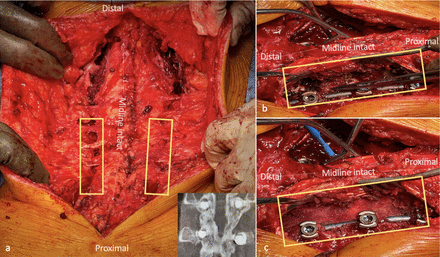
In a T10 to pelvis construct with anterior interbody fusion from L1 to S1, a posterolateral fusion procedure must be performed from T10 to L1. To achieve this, the paraspinal fascial incisions used for T10 to L1 instrumentation are connected and dissected to expose the pars interarticularis, lateral laminae, and facet joints (Figure 15). The SIMPLER technique focuses the fusion procedure medial to the instrumentation, spanning from the pars interarticularis of 1 segment, through the facet joint, into the subjacent level pars interarticularis (Figure 15). This differs from other described fusion techniques lateral to the instrumentation.
Fusion technique: the segments of spinal instrumentation that do not contain anterior interbody fusion grafts must still undergo a formal fusion procedure. (a) With spinal instrumentation and rod reduction fully completed, the areas in yellow boxes require a formal posterior fusion. The fascial openings from the spinal instrumentation are connected. (b) The paraspinal interval is dissected to expose the pars interarticularis, facet joints, and the lateral laminae of the levels to be fused. (c) The fusion bed containing decorticated bone surfaces medial to the instrumentation, packed with bone-morphogenic protein 2 and allograft. Note that the midline is intact without detachment of muscular origins or insertions. Radiographic insert demonstrates a healed fusion with this type of technique. Note the flowing bone along the pars-facet-pars complex.
A high-speed burr is used to decorticate the exposed bone. Off-label rhBMP2 sponges are then placed onto the prepared bony surfaces. Off-label rhBMP2 dosage of approximately 1 mg per “pars-facet-pars” complex is utilized.7 Allograft demineralized bone matrix is additionally placed over the rhBMP2 sponges. Finally, the muscle is allowed to return to its native position, overlying the completed fusion. This will result in a flowing “pars-facet-pars” fusion (Figure 15 inset). This technique minimizes muscular dissection and maximizes fusion within vascularized bony surfaces.
MMS Closure
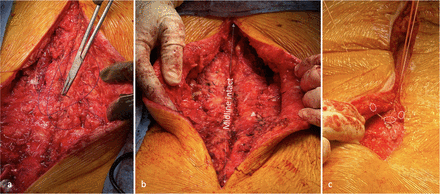
The fascia is closed bilaterally with a running, barbed suture (Figure 16a–b). To reattach the lipocutaneous flaps, interrupted sutures are placed to anchor the flaps to the supraspinous ligament in the midline. A suture traverses the deep dermal layer, through the supraspinous ligament and through the contralateral deep dermal layer (Figure 16c). Sutures placed in this manner eliminate dead space above the fascia while simultaneously reattaching the lipocutaneous flaps to the midline. Deep and suprafascial drains are not necessary. Subcutaneous tissues are reapproximated with running monofilament sutures
Closure of midline muscle sparing approach. (a) Running barbed sutures are performed bilaterally to completely close the fascial openings. (b) Bilateral fascia has been closed in a watertight fashion. Note that the midline has not been violated. There is no need for a deep drain. (c) The lipocutaneous flaps are reattached to the midline with a suturing technique that contains bilateral deep dermal layers and the midline ligamentous complex of the spine. The suture is thrown superficial-to-deep in the deep dermal layer, then through the ligamentous midline spine, and then deep-to-superficial through the contralateral deep dermal layer. The outlined circles demonstrate the appropriate layers for this stitch. This is repeated until the lipocutaneous flaps are completely reattached, and dead-space has been eliminated. Suprafascial drains are not necessary.
Case Example
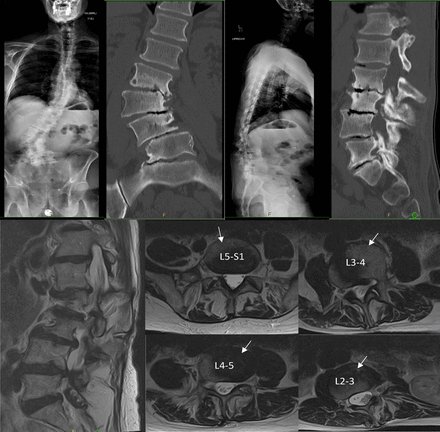
Figure 17 demonstrates a 62-year-old man with ASD. There is a 53° coronal Cobb for the lumbar structural curve (L1−L4), pelvic incidence of 42°, lumbar lordosis of 4°, mismatch of 38°, pelvic tilt of 31°, and C7-SVA of 11.5 cm. There are multiple levels of vacuum disc (L1−S1) with severe facet and intradiscal spondylosis but no ankylosis. The most proximal neutrally rotated vertebral body with a normal disc above it is T12. The MRI demonstrates a normal bifurcation at the L5 vertebral body level.
Case example using Segmental Interbody, Muscle-Preserving, Ligamentotaxis-Enabled Reduction protocol: preoperative radiographs of a 62-year-old man with adult spinal deformity. Spinopelvic parameters include 53° coronal Cobb angle for the thoracolumbar structural curve (L1−L4), pelvic incidence of 42°, lumbar lordosis of 4°, mismatch of 38°, pelvic tilt of 31°, and C7 SVA of 11.5 cm. Computed tomography images also demonstrate severe facet and intradiscal spondylosis without ankylosis. The spinal magnetic resonance imaging demonstrates significant rotational deformity but also shows the various anterior interbody corridors (white arrows) based on the patient’s vascular anatomy.
An ALIF will be performed at L5-S1 followed by sequential lateral interbody fusion cages up to the L1 level. Posteriorly, the construct will extend from T12 to pelvis. A formal fusion will be performed posteriorly at T12 to L1. The correction will be done without an osteotomy.
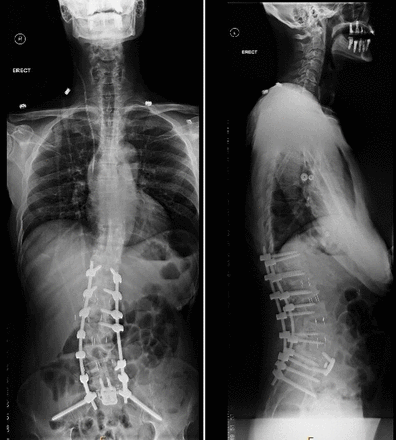
Figure 18 demonstrate the postoperative radiographs of the SIMPLER correction. Coronal Cobb reduced to 22°, lumbar lordosis increased to 45° (mismatch of +3°), pelvic tilt reduced to 14°, and C7-SVA reduced to 1.5 cm. There was improvement in thoracic hypokyphosis, representing a reciprocal compensatory change within the uninstrumented thoracic spine.
Postoperative case example using Segmental Interbody, Muscle-Preserving, Ligamentotaxis-Enabled Reduction: Planned T12-pelvic resulted in significant correction without the use of an osteotomy. Coronal Cobb angle reduced to 22°, lumbar lordosis increased to 45° (mismatch of +3°), pelvic tilt reduced to 14°, and C7 SVA reduced to 1.5 cm. Note the improved thoracic kyphosis within the uninstrumented thoracic spine. This represents a reciprocal compensatory change due to improved lumbar alignment.
Discussion
Staging ASD corrective surgery is intended to lessen the physiologic demand on patients while achieving correction. Despite this intended strategy, there have been mixed findings within the literature. Albayar et al found staging was associated with increased length of stay, pulmonary embolism, and admission costs.27 However, Than et al demonstrated that cMIS-staged surgery appeared safer than staged hybrid surgery.28 Furthermore, Passias et al found that staged procedures were associated with improved radiographic parameters, reduced intensive care unit admissions, and better patient-reported outcomes compared with single-stage procedures.29 They also found that a 3-day interval between stages was ideal. Additionally, staged cMIS ASD correction may have the added benefit of reducing the need for direct decompression or longer constructs.30
Numerous authors have attempted midline sparing dissections for thoracolumbar spinal instrumentation31–38 with the intent of improved instrumentation angulation,39 preservation of subdermal skin vascular supply40 and midline tissue, and prevention of PJK.33 Open deformity surgeons have also adopted the hybrid open muscle-sparing posterior approach. This is a midline incision with a standard subperiosteal dissection in the lumbosacral spine, with the exception at the most proximal levels (UIV, UIV-1, and UIV-2).33 The dissection is stopped at the thoracodorsal fascia and extended laterally to expose the paraspinal musculature. Instrumentation and fusion are performed through the paraspinal interval. The MMS approach described in this publication is the proximal dissection of the hybrid open muscle-sparing approach but performed throughout the entire construct.
Muscular damage/detachment is minimized with the MMS compared with a midline subperiosteal dissection,33 and the angulation for instrumentation ensures maximal screw triangulation and purchase.39 The MMS approach reduces the difficulty associated with percutaneous, subfascial, long-construct rod passage, as the entire fascia is visualized during the process. Additionally, iliac fixation performed through the MMS does not require offset connectors which are often required due to the narrowed lumbosacral screw angulation typically seen in open posterior approaches.41,42 Lastly, an adequate posterolateral fusion with fascial closure can be achieved with the MMS approach.
Various spinopelvic measurements and alignment parameters are described in the literature43,44; however, there appears to be little success in reducing mechanical complications.4 Continual advancements shape our understanding regarding the “ideal” spinal alignment target, but we believe that ligamentotaxis-based spinal realignment surgery represents patient-specific correction. Natural tension of the spinal ligamentous structures ensures proper spinal balance without overcorrection. This ligamentotaxis effect can be seen in other publications as well. Harimaya et al found that some patients experience dramatic increases in lordosis from prone positioning alone.45 Interestingly, these same authors noted 2 distinct groups: hypolordotic patients who gained substantial lordosis from positioning and hyperlordotic patients who did not gain lordosis from positioning. This finding may be observational evidence of ligamentotaxis-based spinal alignment.
This patient-specific correction may be responsible for the marked reduction in mechanical failure and catastrophic complications observed within cMIS correction patients. Anand et al noted rates of PJK of 11.4%, proximal junctional failure of 5.4%, and a hardware failure of 2.2%.8,46,47 We recognize that these results could be attributable to anterior column load sharing, maximal bony integrity (lack of destabilizing osteotomies), soft tissue envelope preservation, osteoporosis treatment with parathyroid hormone analogs, staging, and minimal rod notching. More research is needed to fully validate these results.
Lastly, a discussion about instrumentation is necessary as trends in spinal instrumentation have changed substantially over the years.48 Contemporary “minimally invasive” spinal systems have all become very similar: a pedicle screw with long extended “tabs” that protrude above the level of the fascia/skin. These sleek designs may be well suited for degenerative practice but are lackluster when attempting to impart significant corrective forces. Manufacturers may attempt overcoming this with the advent of precontoured, deformity-specific rods,49 but without a dedicated, graduated, sequential, rod-reduction system that can be attached prior to screw insertion, the effort may be in vain. Furthermore, a larger slot in the tower would allow for easier subfascial passage of the rod, especially in a patient with significant rotatory scoliosis.
Several limitations exist with regard to the SIMPLER technique. This technique relies on a non-ankylosed spine. Additionally, patients with contraindications to anterior spinal access would not be suitable. Failure to achieve correction or failure of indirect decompression may necessitate posterior releases to achieve adequate correction and decompression. The SIMPLER technique is not the panacea for ASD correction. This technique represents an alternative way of achieving correction with minimally invasive surgery, and more research is necessary to evaluate its role in ASD.
Conclusion
This represents one of the first publications to produce a step-by-step cMIS ASD correction technique guide. Through this pictorial, stepwise description, we demonstrate that the SIMPLER approach to ASD correction is reproducible, minimally invasive, and can be done routinely for appropriately selected deformity candidates. This technique serves as a foundation to externally validate previously described cMIS ASD deformity correction outcomes.
Footnotes
Funding The authors received no financial support for the research, authorship, and/or publication of this article.
Declaration of Conflicting Interests The authors report no conflicts of interest in this work.
Disclosures Neel Anand: Consultant (Medtronic Globus Medical, Spinal Balance, Viseon, Spinal Elements, Carlsmed, Orthofix/Seaspine, On-Point Surgical), Royalties (Medtronic, Globus Medical, Elsevier), SAB (Spinal Balance, Cerapedics), Editor/Advisor (Gray's Anatomy), Stocks/Options (Medtronic, Globus Medical, J&J, SI Bone, Orthofix, Paradigm Spine, ISTO Surgical, AF Cell, Bonovo, Atlas Spine, Spinal Balance, Spinal Simplicity, Viseon, On-Point Surgical).
- This manuscript is generously published free of charge by ISASS, the International Society for the Advancement of Spine Surgery. Copyright © 2025 ISASS. To see more or order reprints or permissions, see http://ijssurgery.com.

